
- Chose the Right Type of Boot for the Job
Ideally I want a boot that offers race stiffness in the forward, lateral and aft directions, with a warm liner and enough space to stop my toes getting frostbite, has a walk mode, vibram sole, and weighs less than 1 kg per boot. Unfortunately this doesn’t exist so think really hard and carefully what you want a boot for. If you are doing a lot of uphill or multiday tours then the Evo F1 could be ideal, but if its more downhill orientated you will appreciate the support of the Freedom. I run a World Cup race boot, a Freedom RS, and Evo F1 and the Alien to cover everything from 160 kph runs on my GS skis to skinning up hills for training. Spend a little time contemplating what you really want the boot to do and where you are willing to compromise.
Also bear in mind that a rockered vibram sole is not compatible with traditional alpine downhill bindings and flat DIN soles should be used like those that come with the Scarpa Freedom. Some newer alpine bindings have a height adjustable anti-friction device at the toe that allows adjustment for the additional height between the rockered sole and the top of the toe piece.
- Chose the Right Shell for Your Foot.
This may sound obvious but the boot that is most confortable in the shop may just be the one that has most room around your foot and may end up being the sloppiest to ski. The choice of shell should not be based on colours, brand loyalty or magazine reviews. Each manufacture moulds it boots around its own last and they are all slightly different. i.e. Scarpa’s last for ski boots is 102 mm wide across the forefoot and mid volume in the heal and arch areas whereas Dynafits last is 98 mm across the forefoot and is very low volume throughout. That means a narrow foot with skinny heals will work in the Dynafit whereas a medium to wide foot with normal heals will be better in the Scarpa. The stock shell is just a starting point, and if its confortable straight out the box then its probably too big or has too much volume for your foot. The correct shell length can be confirmed by removing the liner and placing your foot in the empty shell and with your toes just touching the front, there should be 1 cm between the heal and the shell. Remember that the liner will pack out through the moulding process and skiing, especially when the snow is heavy as you put more force through the boot to turn the ski. Once you have a shell that will provide a glove like fit, the boot fitter will heat the liners, put them back in the shell and then strap your feet into the liners while the moulding process goes on.
- Customising the Shell for Your Foot
Once the liner has been moulded, the next step is to customise the shell for any tight or pinch points you may feel. It may be you need to ski the boot for a few hours to work out what needs modified or things may be apparent straight away in the shop. By removing the liner and applying some marker paint to any bone spurs, bunions, or bulges on your foot and then putting your foot back into the shell where the marker paint will be transferred to the inside of the shell. The boot fitter will decide if he can create more room in this area by grinding the internal surface of the shell or if the shell needs ‘blown’ out – a process involving softening the plastic of the shell with a heat gun and then applying and holding pressure to that area with a press. This is usually an overnight process as the plastic in the shell has a strong memory. The various plastics respond differently with grilamid being the easiest to work with and pebax having a stronger memory to overcome. I’ve found I often have to repeat the blowing process on a pebax boot to get the result I want. I usually blow all my boots in the 6th metatarsal area and also at the heal due to bone spurs.
Don’t forget boots that fit well in the colder months may pinch your foot when it swells in the heat of the spring months requiring the shell to be pushed along the side. I find myself pushing my boots again in spring along the 6th metatarsal area since my feet get warm and swell up skiing north faces in mild temperatures between April and June.
If you are bow legged or have other alignment issues you will need to adjust the canting (verticality of the upper cuff). Most shells have the options to adjust forward lean. Before you crank it right forward to the most aggressive angle, see how much you can flex you lower leg forward with your foot flat on the floor. For most people have a more upright forward lean on the boot will allow them to flex forward and absord bumps. If the boots is already forcing you towards the extend of your flexibility, there is little range of motion left for you to flex, and you will end up skiing backseat.
- Customising the Insole
Firstly throw away the piece of cardboard that comes with the boot. Choose a footbed that will support your foot, closely fit the underside of your foot and provide good friction so foot movements result in instantaneous boot and ski movements. A good insole will also prevent the down force from tight buckles collapsing your foot and that burning lactate sensation which has you reaching to pop open the buckles at every opportunity. Superfeet or the more expensive moulded Conformables are a good investment and you may choose to get an electrically heated insole if you suffer from cold feet or are off on expedition (I recommend Lenz electrically heated socks nowadays as you can use them in any boot). I prefer Conformables and run them in all my boots. Superfeet have a little too much heal raise for my liking. Raising the heal from footbed/insole/binding ramp angle (the angle off the horizontal due to the heal being higher than the toes) used to be common to try and make people more aggressive over the front of the skis. However it does the exact opposite. Try it at home, place a book under your heals and I bet you stick your bum out to compensate. In skiing this would make you more backseat. Now try this, feet flat on the floor, lift your toes and notice your weight going forward. Push your toes into the ground and you’ll feel your weight going backseat again. Try lifting your toes when skiing to get that weight forward.
- Choosing the Liner
Surely the liner comes with the boot? Well it does but again you need to decide what you will do with the boot. If the intent is to do day tours you may have no specific requirements but if you are doing multi-day tours or expeditions then you will love Intuition closed cell foam liners. The closed cell structure does not absorb sweat so at the end of the day its easy to dry overnight in a hut or sleeping bag whereas a porous liner will stay saturated and may freeze without a direct heat source causing you major problems. There are other reasons why you may discard the stock liner. An Intuition Powerwrap is warmer, stiffer and will take some volume out of the boot, and the Intuition Pro Tour is designed specifically with that with a hinge point, rear stiffener and a choice of tongue stiffness’s.
Scarpa’s boots come with Inuition Liners as stock
- Customising the Liner
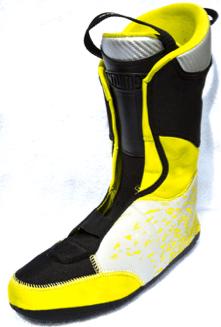
It’s now time to get the liner thermo moulded to your anatomy. The boot fitter will place the liner in an oven at 200 F for around 10 minutes until the liner looses a little stiffness. It will then be placed in the shell and you’ll be asked to slide your foot into the liner. The boot fitter may have already placed some foam pads on any bone protuberances to create more space for them while the liners conforms to your anatomy. If you are ski mountaineering make sure you mould with toe caps in place to create a warm air space for your toes within the boot. Its essential that you get the heal firmly into the back of the boot and you’ll be asked to stomp down on the heal which will create a nice heal cup to hold your heal securely – you don’t want heal lift touring and any lateral heal movement will make it tough to smear the tail of the ski when you are buttering the turns off. The boot fitter will crank up the buckles and ask you to walk around and flex for ten minutes or so. And that’s it, well, almost. Final adjustments to remove volumecan be done by adding customised shapes of self-adhesive foam to any problem areas. In the photo below you can see where I added 2 mm thick green foam around the heal to get the glove fit I was after with my skinny Achilles. These simple bits of foam can transform a boot from almost unskiable to world class so bear that in mind and if you think you’ll need some once the liner packs out ask the bootfitter to give you a sheet to take away. In the second photo below you’ll see how I put foam ontop of my foot to take volume out around the ankle to get the heal locked down in the boot – super important with modern skis where you can use heal pressure to control the ski at the end of turns. Alos if you have low volume foot like mine and your liner has a lacing option, use it.


Customising the fit of your liner with self adhesive foam & use of laces
Read more about moulding liners here: http://www.powder.com/gear/gear-hack-how-to-cook-your-liners-in-an-oven/ – GpEHChwuVVLvCYdh.97
Finally I am going to mention a few other things I use to get that glove like boot fit. Don’t forget boots that fit well in the colder months may pinch your foot when it swells in the heat of the spring months requiring the shell to be pushed along the side.
- Spoilers – these typically come with alpine boots and are a wedge of plastic that velcros to the top back of the liner to take out any space. Skiing is a very dynamic sport and when you want to put power on the back of the boot the last thing you want is a delay as your leg chances angle to move from shin contact to calf contact. My calf muscles also disappear as I go from the climbing and biking season into the ski season so it something I introduce as my anatomy changes through the season.
- Volume Reducers
These are flat incompressible foam or rubber insoles that you place under your moulded insole to take out some volume. Typically 2 or 3 mm but if you need more a cork board might be the solution.
- Heal lifts
An incompressible foam or rubber wedge under the heal to take out room. I don’t like these much as it changes the ramp angle – its remarkable that you will notice a change of a couple of mm in heal height causing you to be more backseat or thrown forward – until you get used to it and subconsciously compensate.
Read more about tech binding delta (ramp) here: https://www.wildsnow.com/10733/get-up-rise-up-stand-up-for-your-ramp/
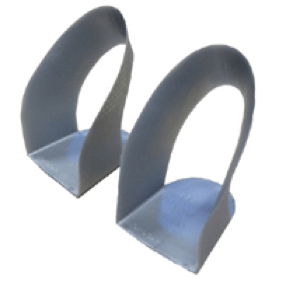
- Heal Space Frame
These cheap plastic frames create a more pronounced heal pocket by inserting over the outside of the liner. They do push your foot forward and you’ll notice more pressure on your toes. I also find that while they are good for downhill, they tend to give me blisters along the sides of my Achilles and so I always use adhesive foam.

Some great tips and reviews here. Thank you so much for sharing such great information to improve ski boot fitting experience. I recently bought new ski boots online and I am so glad that I remember your awesome tips and helped me while buying it.
LikeLike